
自定义ViewGroup,写自己的View继承自ViewGroup,然后重写它的onMeasure和onLayout方法即可。
onMeasure 测量阶段主要分3步
- 循环调用子view的measure方法,测量子view的宽高并保存
- 通过子view的宽高,来确定自己的宽高
- setMeasuredDimension()方法来保存自己的宽高
计算子view的尺寸,需要通过父view的测量模式和大小和子view的LayoutParams 来确定。
View的三种测量模式
EXACTLY:精准测量模式,比如我们在xml中使用match_parent和写死dp值,如果父view是这种模式,那么子veiw在测量的时候,肯定不能超过这个固定的值,返回MeasureSpec中的size。
AT_MOST:最大测量模式,比如我们在xml中是用wrap_content,如果父view是这种模式,理论上讲父view的大小是可以无限大的,但是我们也不知道这个值是多少,就暂时把父view当前的size返回,也是MeasureSpec中的size
UNSPECIFIED:无限制测量模式,没有任何限制,一般用不到。
onLayout()布局阶段主要分两步
- 根据onMeasure中的测量结果,找出子view的左 上 右 下 四个位置的数值
- 调用子view的layout方法,传入上面求出来的四个值,完成布局
下面开始实现一个流式布局的自定义
首先定义一个类FlowLayout继承自ViewGroup,然后开始实现其onMeasure方法
1 | protected void onMeasure(int widthMeasureSpec, int heightMeasureSpec) { |
循环遍历子view,通过调用系统提供的measureChild方法来测量子view的宽高。
在计算子view的宽高的同时也计算自己的宽高
对于宽,流式布局,我们知道,当子view的宽度相加和大于父view的可用宽的时候,需要换行,所以每一行的子view相加的宽度可能都不一样,我们需要找到一个最大值来当做我们自定义的ViewGroup的宽度,也就是上面代码中的measureWidth
对于高度,定义一个currentHeight来记录当前的高度,没当换一行的时候,它的大小就加上子view的高度
最后通过setMeasuredDimension方法保存自己的宽高。自己的宽高也要根据自己的测量模式来确定,resolveSize就是系统给提供的一个很好用的根据测量模式来返回最终结果的工具方法,传入我们期望宽高和宽高的测量模式即可,省去我们自己根据测量模式来判断返回值。
1 | public static int resolveSize(int size, int measureSpec) { |
然后开始布局1
2
3
4
5
6
7
8
9
10
11
12
13
14
15
16
17
18
19
20
21
22
23
24
25
26
27
28
29
30
31
32
33
34
35protected void onLayout(boolean b, int i, int i1, int i2, int i3) {
//自身的可用宽
int width = getWidth()-getPaddingLeft()-getPaddingRight();
//当前行子view的总宽度
int currentWidth = 0;
//当前高度
int currentHeight = 0;
//根据上面onMeasure中测量的值,遍历布局子view,算出子view的左上右下的值,调用其layout方法
int childCount = getChildCount();
for (int j = 0; j < childCount; j++) {
View chileView = getChildAt(j);
//得到子view的测量数据
MarginLayoutParams layoutParams = (MarginLayoutParams)chileView.getLayoutParams();
//子view最终实际占用的宽高需要加上它的margin值
int childWidth = chileView.getMeasuredWidth()+ layoutParams.leftMargin+layoutParams.rightMargin;
int childHeight = chileView.getMeasuredHeight()+layoutParams.topMargin+layoutParams.bottomMargin;
//如果如果当前宽度加上下一个子view的宽度小于父view可用的宽度,就加上子view的宽
//反之,当前宽度重置为下一个子view的宽
if(currentWidth+childWidth<width){
currentWidth = currentWidth+childWidth;
}else {
currentWidth = childWidth;
currentHeight = currentHeight + childHeight;
}
//计算出子view左 上 右 下 的位置
int childL = currentWidth - childWidth+layoutParams.leftMargin+layoutParams.rightMargin;
int childT = currentHeight+layoutParams.topMargin+layoutParams.bottomMargin;
int childR = childL+chileView.getMeasuredWidth();
int childB = childT + chileView.getMeasuredHeight();
//布局
chileView.layout(childL,childT,childR,childB);
}
}
注释很清楚,求出每个View的左 上 右 下的数值,然后调用子view的layout方法进行布局。
OK 一个简单的流式布局就完成了
使用的时候在布局文件中或者在代码中添加数据都可以
xml中添加1
2
3
4
5
6
7
8
9
10
11
12
13
14
15
16
17
18
19
20
21
22
23
24
25
26
27
28
29
30
31
32
33
34
35
36
37
38
39
40
41
42
43
44
45
46
47
48
49<com.chs.androiddailytext.netease.FlowLayout
android:id="@+id/flow_layout"
android:layout_width="wrap_content"
android:layout_height="wrap_content">
<TextView
style="@style/text_flow"
android:text="哈哈" />
<TextView
style="@style/text_flow"
android:text="嘎嘎嘎嘎" />
<TextView
style="@style/text_flow"
android:text="呱呱呱呱呱" />
<TextView
style="@style/text_flow"
android:text="摇摇摇" />
<TextView
style="@style/text_flow"
android:text="切克闹" />
<TextView
style="@style/text_flow"
android:text="呵呵呵呵" />
<TextView
style="@style/text_flow"
android:text="嘿嘿嘿IEhi额嘿嘿" />
<TextView
style="@style/text_flow"
android:text="哇哇哇哇" />
<TextView
style="@style/text_flow"
android:text="来来来来" />
<TextView
style="@style/text_flow"
android:text="小bitch" />
<TextView
style="@style/text_flow"
android:text="come on baby" />
<TextView
style="@style/text_flow"
android:text="都是弟弟" />
</com.chs.androiddailytext.netease.FlowLayout>
代码中添加,在activity中1
2
3
4
5
6
7
8
9
10
11
12
13
14
15
16
17
18
19
20
21
22
23
24
25var datas = mutableListOf<String>()
datas.add("刮刮卡")
datas.add("粒子效果")
datas.add("splash")
datas.add("QQ红点拖拽")
datas.add("PathMeasure")
datas.add("屏幕适配")
datas.add("刘海适配")
datas.add("刘海适配")
datas.add("FlowLayout")
datas.add("FlowLayout")
for (str in datas){
val textview = TextView(this)
val lp = ViewGroup.MarginLayoutParams(
ViewGroup.LayoutParams.WRAP_CONTENT,
ViewGroup.LayoutParams.WRAP_CONTENT)
lp.setMargins(15,15,15,15)
textview.layoutParams = lp
textview.text = str
textview.textSize = 20f
textview.background = ContextCompat.getDrawable(this,R.drawable.text_bg)
flow_layout.addView(textview)
}
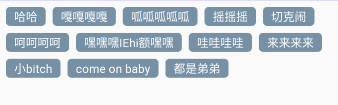
最后效果:
参考 :
自定义ViewGroup,写自己的View继承自ViewGroup,然后重写它的onMeasure和onLayout方法即可。
onMeasure 测量阶段主要分3步
- 循环调用子view的measure方法,测量子view的宽高并保存
- 通过子view的宽高,来确定自己的宽高
- setMeasuredDimension()方法来保存自己的宽高
计算子view的尺寸,需要通过父view的测量模式和大小和子view的LayoutParams 来确定。
View的三种测量模式
EXACTLY:精准测量模式,比如我们在xml中使用match_parent和写死dp值,如果父view是这种模式,那么子veiw在测量的时候,肯定不能超过这个固定的值,返回MeasureSpec中的size。
AT_MOST:最大测量模式,比如我们在xml中是用wrap_content,如果父view是这种模式,理论上讲父view的大小是可以无限大的,但是我们也不知道这个值是多少,就暂时把父view当前的size返回,也是MeasureSpec中的size
UNSPECIFIED:无限制测量模式,没有任何限制,一般用不到。
onLayout()布局阶段主要分两步
- 根据onMeasure中的测量结果,找出子view的左 上 右 下 四个位置的数值
- 调用子view的layout方法,传入上面求出来的四个值,完成布局
下面开始实现一个流式布局的自定义
首先定义一个类FlowLayout继承自ViewGroup,然后开始实现其onMeasure方法
1 | protected void onMeasure(int widthMeasureSpec, int heightMeasureSpec) { |
循环遍历子view,通过调用系统提供的measureChild方法来测量子view的宽高。
在计算子view的宽高的同时也计算自己的宽高
对于宽,流式布局,我们知道,当子view的宽度相加和大于父view的可用宽的时候,需要换行,所以每一行的子view相加的宽度可能都不一样,我们需要找到一个最大值来当做我们自定义的ViewGroup的宽度,也就是上面代码中的measureWidth
对于高度,定义一个currentHeight来记录当前的高度,没当换一行的时候,它的大小就加上子view的高度
最后通过setMeasuredDimension方法保存自己的宽高。自己的宽高也要根据自己的测量模式来确定,resolveSize就是系统给提供的一个很好用的根据测量模式来返回最终结果的工具方法,传入我们期望宽高和宽高的测量模式即可,省去我们自己根据测量模式来判断返回值。
1 | public static int resolveSize(int size, int measureSpec) { |
然后开始布局1
2
3
4
5
6
7
8
9
10
11
12
13
14
15
16
17
18
19
20
21
22
23
24
25
26
27
28
29
30
31
32
33
34
35protected void onLayout(boolean b, int i, int i1, int i2, int i3) {
//自身的可用宽
int width = getWidth()-getPaddingLeft()-getPaddingRight();
//当前行子view的总宽度
int currentWidth = 0;
//当前高度
int currentHeight = 0;
//根据上面onMeasure中测量的值,遍历布局子view,算出子view的左上右下的值,调用其layout方法
int childCount = getChildCount();
for (int j = 0; j < childCount; j++) {
View chileView = getChildAt(j);
//得到子view的测量数据
MarginLayoutParams layoutParams = (MarginLayoutParams)chileView.getLayoutParams();
//子view最终实际占用的宽高需要加上它的margin值
int childWidth = chileView.getMeasuredWidth()+ layoutParams.leftMargin+layoutParams.rightMargin;
int childHeight = chileView.getMeasuredHeight()+layoutParams.topMargin+layoutParams.bottomMargin;
//如果如果当前宽度加上下一个子view的宽度小于父view可用的宽度,就加上子view的宽
//反之,当前宽度重置为下一个子view的宽
if(currentWidth+childWidth<width){
currentWidth = currentWidth+childWidth;
}else {
currentWidth = childWidth;
currentHeight = currentHeight + childHeight;
}
//计算出子view左 上 右 下 的位置
int childL = currentWidth - childWidth+layoutParams.leftMargin+layoutParams.rightMargin;
int childT = currentHeight+layoutParams.topMargin+layoutParams.bottomMargin;
int childR = childL+chileView.getMeasuredWidth();
int childB = childT + chileView.getMeasuredHeight();
//布局
chileView.layout(childL,childT,childR,childB);
}
}
注释已经很清楚,求出每个View的左 上 右 下的数值,然后调用子view的layout方法进行布局。
OK 一个简单的流式布局就完成了
使用的时候在布局文件中或者在代码中添加数据都可以
xml中添加1
2
3
4
5
6
7
8
9
10
11
12
13
14
15
16
17
18
19
20
21
22
23
24
25
26
27
28
29
30
31
32
33
34
35
36
37
38
39
40
41
42
43
44
45
46
47
48
49<com.chs.androiddailytext.netease.FlowLayout
android:id="@+id/flow_layout"
android:layout_width="wrap_content"
android:layout_height="wrap_content">
<TextView
style="@style/text_flow"
android:text="哈哈" />
<TextView
style="@style/text_flow"
android:text="嘎嘎嘎嘎" />
<TextView
style="@style/text_flow"
android:text="呱呱呱呱呱" />
<TextView
style="@style/text_flow"
android:text="摇摇摇" />
<TextView
style="@style/text_flow"
android:text="切克闹" />
<TextView
style="@style/text_flow"
android:text="呵呵呵呵" />
<TextView
style="@style/text_flow"
android:text="嘿嘿嘿IEhi额嘿嘿" />
<TextView
style="@style/text_flow"
android:text="哇哇哇哇" />
<TextView
style="@style/text_flow"
android:text="来来来来" />
<TextView
style="@style/text_flow"
android:text="小bitch" />
<TextView
style="@style/text_flow"
android:text="come on baby" />
<TextView
style="@style/text_flow"
android:text="都是弟弟" />
</com.chs.androiddailytext.netease.FlowLayout>
代码中添加1
2
3
4
5
6
7
8
9
10
11
12
13
14
15
16
17
18
19
20
21
22
23
24
25var datas = mutableListOf<String>()
datas.add("刮刮卡")
datas.add("粒子效果")
datas.add("splash")
datas.add("QQ红点拖拽")
datas.add("PathMeasure")
datas.add("屏幕适配")
datas.add("刘海适配")
datas.add("刘海适配")
datas.add("FlowLayout")
datas.add("FlowLayout")
for (str in datas){
val textview = TextView(this)
val lp = ViewGroup.MarginLayoutParams(
ViewGroup.LayoutParams.WRAP_CONTENT,
ViewGroup.LayoutParams.WRAP_CONTENT)
lp.setMargins(15,15,15,15)
textview.layoutParams = lp
textview.text = str
textview.textSize = 20f
textview.background = ContextCompat.getDrawable(this,R.drawable.text_bg)
flow_layout.addView(textview)
}
最后效果:
参考: https://blog.csdn.net/lmj623565791/article/details/38352503