Handler机制
Handler在我们日常开发中会经常用到,它主要用于处理异步消息,当发出一个消息之后,首先进入到一个消息队列,发送消息的函数即可返回,而另外一个部分在消息队列中逐一取出,然后对消息进行处理。
虽然经常用到它,但是用的方式不正确也会产生一些问题,下面先来了解一些Handler相关的问题并解决
Handler造成内存泄漏
Andorid中一般都是在子线程中执行耗时的业务逻辑,然后通过Handler发从消息到主线程中去更新UI。
当使用内部类或者匿名内部类创建一个Handler的时候,它会隐式持有外部对象的引用,一般是Activity,如果我们在耗时线程还没完成的时候关闭了Activity,这时候线程还在运行,线程持有handler的引用,handler持有Activity的引用,导致Activity无法被回收从而造成内存泄漏。
另外,如果我们使用了 handler.postDelayed()方法,它会把Handler封装成一个Message对象,并把Message对象放入MessageQueue队列中,那么在延时时间到达之前,会有一个引用持有的链:MessageQueue->Message->Hanlder->Activity。从而导致Activity无法被回收,造成内存泄漏
解决办法:
- 在Activity的onDestroy方法中把线程停掉,把Handler直接制空,在使用Hanlder的地方先判断是否为空在执行后面的逻辑
- 将Hanlder设置为静态对象,Java中静态类不会持有外部类的引用,Activity就可以被回收了。不过这时候由于Handler不在持有Activity的引用也就不能更新UI了,这时候需要把Activity传入Handler中,Handler中使用弱引用保存Activity来保证Activity可以被回收。
为什么不能直接在子线程中创建空构造函数的Handler
在子线程中直接new一个Handlernew Handler()会出错1
java.lang.RuntimeException: Can't create handler inside thread[Thread..] that has not called Looper.prepare()
这是为什么呢?我们可以跟进代码看一下1
2
3
4
5
6
7
8
9
10
11
12
13
14
15
16
17public Handler() {
this(null, false);
}
public Handler(Callback callback, boolean async) {
....
mLooper = Looper.myLooper();
if (mLooper == null) {
throw new RuntimeException(
"Can't create handler inside thread " + Thread.currentThread()
+ " that has not called Looper.prepare()");
}
mQueue = mLooper.mQueue;
mCallback = callback;
mAsynchronous = async;
}
可以看到当mLooper为null的时候就会派出这个异常,也就是Looper.myLooper()这个方法返回null,它为什么会为null,跟进代码中1
2
3
4
5static final ThreadLocal<Looper> sThreadLocal = new ThreadLocal<Looper>();
public static @Nullable Looper myLooper() {
return sThreadLocal.get();
}
可以看到它是去ThreadLocal中去取这个looper,ThreadLocal相当与一个Map,key是当前线程,值就是looper,在子线程中直接new一个Handler,如果该线程在ThreadLocal中没有对象的looper那就会报错了
那主线程中为什么可以直接new呢,当然是主线程中已经在ThreadLocal中设置好了对应的looper对象了。我们知道Activity的主函数是在在ActivityThread类中,在ActivityThread的main方法中,可以看到这句话1
2
3
4
5
6
7
8
9
10
11
12
13
14
15
16
17
18
19
20
21
22
23
24 Looper.prepareMainLooper();
public static void prepareMainLooper() {
prepare(false);
synchronized (Looper.class) {
if (sMainLooper != null) {
throw new IllegalStateException("The main Looper has already been prepared.");
}
sMainLooper = myLooper();
}
}
private static void prepare(boolean quitAllowed) {
if (sThreadLocal.get() != null) {
throw new RuntimeException("Only one Looper may be created per thread");
}
sThreadLocal.set(new Looper(quitAllowed));
}
public void set(T value) {
       Thread t = Thread.currentThread();
       ThreadLocalMap map = getMap(t);
       if (map != null)
           map.set(this, value);
       else
           createMap(t, value);
   }
可以看到在prepare方法中就给ThreadLocal中放置了Looper,key就是当前线程
我们可以给Hanlder传入一个Looper来防止出错比如
new Handler(Looper.getMainLooper());或者在new Handler之前调用Looper.prepare();
textview.setText()这句代码只能在主线程中执行吗?
做我们大Android开发的都知道,不能再子线程中更新UI,但是如果我们new一个Thread在其run方法中调用textview.setText()方法,我们会发现竟然成功了并且不会报错,这是为什么呢?
在我们setText刷新布局的时候,会执行到checkForRelayout()方法,这个方法最后会执行 requestLayout()和invalidate()方法来请求重新布局和重新绘制,跟进这两个方法会发现最后分别会来到ViewRootImpl这个类的requestLayout()这里面会有一个checkThread()方法。1
2
3
4
5
6
7
8
9
10
11
12
13
14
15
16
17
18
19
20
21
22
23
24
25
26
27
28
29private void checkForRelayout() {
...
requestLayout();
invalidate();
}
//View中的requestLayout()
public void requestLayout() {
...
//mParent其实就是ViewRootImpl
if (mParent != null && !mParent.isLayoutRequested()) {
mParent.requestLayout();
}
...
}
//ViewRootImpl 中的requestLayout()
@Override
public void requestLayout() {
if (!mHandlingLayoutInLayoutRequest) {
checkThread();
mLayoutRequested = true;
scheduleTraversals();
}
}
void checkThread() {
if (mThread != Thread.currentThread()) {
throw new CalledFromWrongThreadException(
"Only the original thread that created a view hierarchy can touch its views.");
}
}
checkThread()里面就会判断当前线程是不是主线程,如果不是就会抛出这个异常了。
为什么setText()不会抛这个异常呢,因为mThread是在是在ViewRootImpl的构造方法中赋值的,而ViewRootImpl 是在Activity 对象被创建完毕后才会被创建,而requestLayout()方法被调用之前都会判断一下ViewRootImpl是否为null,不为null才会执行。
如果setText()方法速度够快,在ViewRootImpl没有被创建之前就完成刷新,就不会报错了。
1 | final void handleResumeActivity(IBinder token, |
所以如果我们setText的执行速度比创建ViewRootImpl的速度快,就不会执行到检查线程的方法了。就会绘制成功
new Handler()的两种写法有什么不同?
两种写法1
2
3
4
5
6Handler mHandler1 = new Handler(new Handler.Callback() {
@Override
public boolean handleMessage(Message msg) {
return false;
}
});
1 | Handler mHandler2 = new Handler(){ |
如果把这两个方法在写在AndroidStudio中会看到第二种方法会报黄色警告,所以推荐第一种写法。在Hanlder的dispatchMessage方法中1
2
3
4
5
6
7
8
9
10
11
12public void dispatchMessage(Message msg) {
if (msg.callback != null) {
handleCallback(msg);
} else {
if (mCallback != null) {
if (mCallback.handleMessage(msg)) {
return;
}
}
handleMessage(msg);
}
}
msg.callback 其实就是一个 Runnable ,handleCallback(msg)方法其实就是执行它的run方法。如果mCallback不为null,就会执行它的handleMessage方法,这个mCallback就是第一种方法传过来的Callback。当前面两种情况都不成立的时候才会执行handleMessage它自己的方法。
第二种方法相当于创建了一个Handler的子类,并实现了父类的handleMessage方法。第一种方法相当于创建了一个Handler对象,传入一个回调。
ThreadLocal的原理
1 | public class ThreadLocal<T> {......} |
ThreadLocal是一个本地线工具类,主要用于将私有线程和该线程存放的副本对象做一个映射,各个线程之间的变量互不干扰,在高并发场景下,可以实现无状态的调用
ThreadLocal相当于一个Map,它的key是当前线程,它的value是T,我们可以指定任意类型来保存。
1 | public T get() { |
get()方法,首先通过当前线程去ThreadLocalMap中拿到ThreadLocalMap<ThreadLocal, Object>,然后通过当前ThreadLocal拿到值。如果拿不到调用setInitialValue()方法。1
2
3
4
5
6
7
8
9
10private T setInitialValue() {
T value = initialValue();
Thread t = Thread.currentThread();
ThreadLocalMap map = getMap(t);
if (map != null)
map.set(this, value);
else
createMap(t, value);
return value;
}
这里面使用initialValue方法获取value然后保存,initialValue方法默认返回null,可以通过子类来实现需要保存的对象。1
2
3
4
5
6
7
8public void set(T value) {
Thread t = Thread.currentThread();
ThreadLocalMap map = getMap(t);
if (map != null)
map.set(this, value);
else
createMap(t, value);
}
set方法也是通过当前线程拿到ThreadLocalMap<ThreadLocal, Object>,然后把值存放到ThreadLocalMap中。如果ThreadLocalMap为空就创建一个
Handler源码分析
Handler源码中主要有四个重要的对象Handler Looper Message MessageQueue
(1)创建主线程Looper
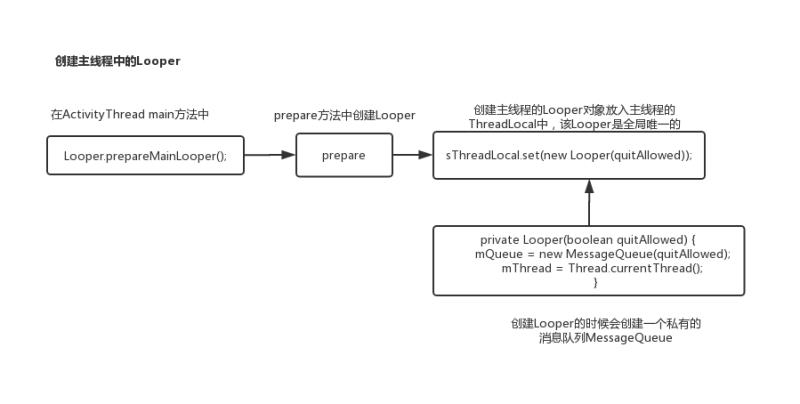
1 | Looper.prepareMainLooper(); |
在ActivityThread类的main方法中调用Looer的静态方法prepareMainLooper,创建了一个Looper并放入ThreadLocal中保存。前面已经了解到每个线程都有自己的ThreadLocal,保存自己的私有变量,这里ActivityThread就是主线程中。1
2
3
4private Looper(boolean quitAllowed) {
mQueue = new MessageQueue(quitAllowed);
mThread = Thread.currentThread();
}
创建Looper的时候,创建了一个私有的消息队列
(2)创建Handler
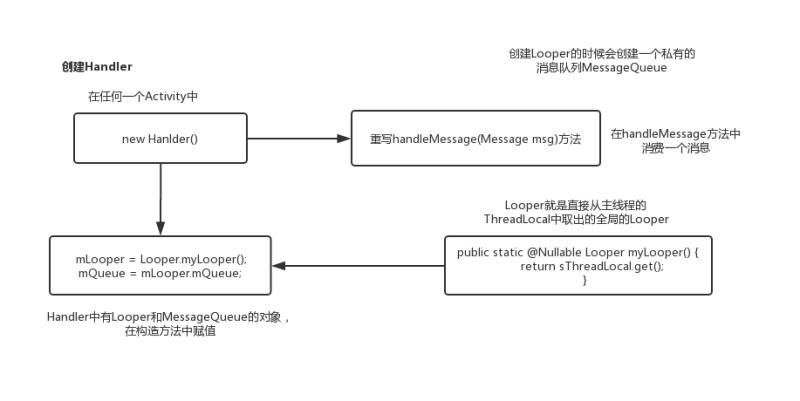
1 | Handler handler = new Handler(){ |
这一步我们都很熟练了,在handleMessage中处理消息,看一下Handler的构造方法1
2
3
4
5
6
7
8
9
10
11
12
13
14
15
16
17
18public Handler() {
this(null, false);
}
public Handler(Callback callback, boolean async) {
......
mLooper = Looper.myLooper();
if (mLooper == null) {
throw new RuntimeException(
"Can't create handler inside thread " + Thread.currentThread()
+ " that has not called Looper.prepare()");
}
mQueue = mLooper.mQueue;
mCallback = callback;
mAsynchronous = async;
}
public static @Nullable Looper myLooper() {
return sThreadLocal.get();
}
拿到当前线程的Looper对象,把Looper中的消息队列赋值给自己的成员变量mQueue,如果传入了回调对象,给回调对象mCallback复制。
(3)发送消息
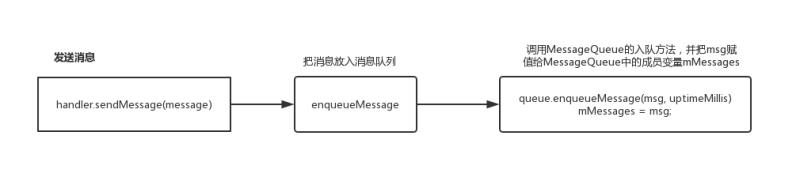
发送消息有好几方法 sendMessage,sendEmptyMessage,sendEmptyMessageDelayed,sendMessageAtTime等,最终都会进入下面的方法中调用enqueueMessage方法1
2
3
4
5
6
7
8
9
10public boolean sendMessageAtTime(Message msg, long uptimeMillis) {
MessageQueue queue = mQueue;
if (queue == null) {
RuntimeException e = new RuntimeException(
this + " sendMessageAtTime() called with no mQueue");
Log.w("Looper", e.getMessage(), e);
return false;
}
return enqueueMessage(queue, msg, uptimeMillis);
}
enqueueMessage从名字就可以看出,是消息入队,mQueue就是前面从Looper中拿到的队列1
2
3
4
5
6
7private boolean enqueueMessage(MessageQueue queue, Message msg, long uptimeMillis) {
msg.target = this;
if (mAsynchronous) {
msg.setAsynchronous(true);
}
return queue.enqueueMessage(msg, uptimeMillis);
}
这里把自己也就是Hanlder赋值给Message中的target,后面通过这个Handler的引用调用处理消息的方法。然后调用消息队列MessageQueue的入队方法1
2
3
4
5
6
7
8
9
10
11
12
13
14
15
16
17
18
19
20
21
22
23
24
25
26
27boolean enqueueMessage(Message msg, long when) {
...
Message p = mMessages;
boolean needWake;
if (p == null || when == 0 || when < p.when) {
// New head, wake up the event queue if blocked.
msg.next = p;
mMessages = msg;
needWake = mBlocked;
} else {
needWake = mBlocked && p.target == null && msg.isAsynchronous();
Message prev;
for (;;) {
prev = p;
p = p.next;
if (p == null || when < p.when) {
break;
}
if (needWake && p.isAsynchronous()) {
needWake = false;
}
}
msg.next = p; // invariant: p == prev.next
prev.next = msg;
}
...
}
可以看到Message是一个链表结构,这里把消息放入到链表的next中。
(4)消费消息
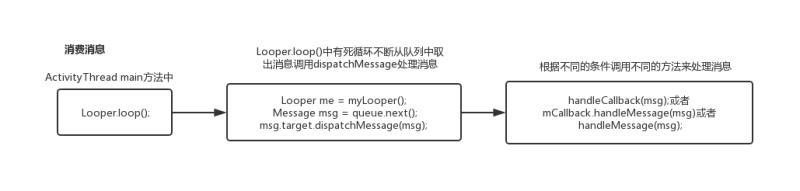
回到ActivityThread 的main方法中,在调用完Looper.prepareMainLooper();之后,又调用了Looper.loop();方法
1 | public static void loop() { |
上面的代码中,拿到当前线程的Looper,然后拿到Looper中的消息队列,然后开启一个死循环,通过Message msg = queue.next();不断取出消息然后调用msg.target.dispatchMessage(msg);方法处理消息。
前面enqueueMessage方法中我们知道msg.target就是Handler对象。所以这里调用的就是Handler中的dispatchMessage方法1
2
3
4
5
6
7
8
9
10
11
12public void dispatchMessage(Message msg) {
if (msg.callback != null) {
handleCallback(msg);
} else {
if (mCallback != null) {
if (mCallback.handleMessage(msg)) {
return;
}
}
handleMessage(msg);
}
}
这里面有三个处理消息的方式,第二个和第三个分别对应文章开头的的两种创建Handler的方式。第一个msg.callback是啥呢,我们去Message中看到他是一个Runnable对象1
2
3
4
5
6
7
8
9
10
11
12
13
14
15handler.post(new Runnable() {
@Override
public void run() {
}
})
public final boolean post(Runnable r)
{
return sendMessageDelayed(getPostMessage(r), 0);
}
private static Message getPostMessage(Runnable r) {
Message m = Message.obtain();
m.callback = r;
return m;
}
当我们调用handler.post()方法的时候,传入一个Runnable对象,其实就是我们传入的这个Runnable。
OK,Handler的流程分析完毕。
手写Handler练习
前面已经了解了Handler原理,如果能手写一个简单的Handler那就真的掌握啦,现在就开始写一个吧
根据前面的分析,可以知道这里涉及到了几个类,ActivityThread,Message,MessageQueue,Handler,Looper。
因为Activity在启动后ActivityThread这个类的main方法就已经执行完了
所以我们直接在工程的test文件夹下面创建一个ActivityThread来模拟Activity的入口。
1 | public class ActivityThread { |
很简单就按照之前分析的四步来,(1)准备Looper,(2)创建Handler重写handleMessage方法处理消息,(3)发送消息,(4)开启循环处理消息。
Message类:1
2
3
4
5
6
7
8
9
10
11
12
13
14
15public class Message {
public int what;
public Handler target;
/**
* 消息对象
*/
public Object obj;
@Override
public String toString() {
return obj.toString();
}
}
MessageQueue类,使用一个阻塞队列ArrayBlockingQueue来模拟。1
2
3
4
5
6
7
8
9
10
11
12
13
14
15
16
17
18
19
20
21
22public class MessageQueue {
private ArrayBlockingQueue<Message> mMessages = new ArrayBlockingQueue<Message>(50);
//消息入队
public void enqueueMessage(Message msg) {
try {
mMessages.put(msg);
} catch (InterruptedException e) {
e.printStackTrace();
}
}
//取消息
public Message next() {
try {
return mMessages.take();
} catch (InterruptedException e) {
e.printStackTrace();
}
return null;
}
}
Looper类1
2
3
4
5
6
7
8
9
10
11
12
13
14
15
16
17
18
19
20
21
22
23
24
25
26
27
28
29
30
31
32
33
34
35
36public class Looper {
static final ThreadLocal<Looper> sThreadLocal = new ThreadLocal<Looper>();
MessageQueue mQueue;
public Looper() {
mQueue = new MessageQueue();
}
public static void prepareMainLooper() {
prepare();
}
private static void prepare() {
if (sThreadLocal.get() != null) {
throw new RuntimeException("Only one Looper may be created per thread");
}
sThreadLocal.set(new Looper());
}
public static Looper myLooper() {
return sThreadLocal.get();
}
//开启循环
public static void loop() {
Looper me = myLooper();
MessageQueue queue = me.mQueue;
while (true){
Message msg = queue.next();
if(msg!=null){
if(msg.target!=null){
msg.target.dispatchMessage(msg);
}
}
}
}
}
OK完成啦,在ActivityThread这个测试类中直接运行代码可以看到日志中输出 Hello Handler 成功!